There is no access to the Windows 10 folder. How to restore access to the folder
After a clean installation of Windows 10, when I tried to open one of the folders on the system drive, I received an interesting message. The system displays a window with the inscription You do not have permissions to access this folder. This all happens when using a licensed Windows 10 and a Microsoft account.
To get permanent access to this folder, the system prompts you to click the continue button. I really thought that everything would be very simple and after pressing the continue button, the desired folder would immediately be opened, but everything just doesn’t work that way. A new window opens with the inscription You are denied access to this folder. And there is already a useful message here, in order to gain access to this folder, you must go to the security tab.
In this instruction, we will look at what to do when you do not have permissions to access a folder and you are denied access to the same folder on Windows 10. Let's look at several ways to open access to a folder using the Windows 10 operating system as an example.
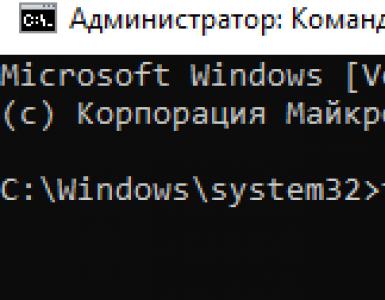
Open access with the takeown command
For more advanced users, it is possible to enable access to a folder running the Windows 10 operating system using the command line. The disadvantage of this method is that if there is a lot of data in the folder, the process of executing the command may be delayed. See our article for all the methods, since in the latest versions of Windows 10, the command line in the Win + X context menu has been replaced with Windows PowerShell.

After successful execution of the command, the user will have access to the required folder. Compared to the previous method, this one takes much longer.
conclusions
Thanks to one of our methods, you will be able to open a folder where you were previously denied access and you did not have permission to access. We looked at how to open access to a folder in Windows 10 using security settings and the command line.
Usually folders that are not accessible are hidden. Therefore, it may be worth just turning off the display. I hope the article will be useful to many users. Since installing the system and owning an administrator account, as it turned out, by default there is no access to all folders on the system drive.
If you receive an error You are denied access to this folder Windows 10 on other local drives, then you should check the system for malware. You can use years for this.
You can find a dozen cases on the network when a user cannot access the F, C or D drive on which Windows 10 is installed. As a result of such an error, Windows 10 fails to boot and the PC, in fact, becomes inoperative. What to do in this case, what actions to take to solve the problem?
Causes of a Locked Disk Problem
If, when you turn on the PC, a message appears on the monitor screen stating that there is no access to the D drive or Windows 10 is denied access, this indicates that the 100 MB boot partition (System Reserved) is damaged or missing.
Also, the causes of this problem include:
- Upgrade PC from Windows 7 or Windows 8 to Windows 10;
- Lack of the Intel Rapid Storage Technology driver, which is required for the correct functioning of Intel Smart Response Technology (SRT);
- Transfer Windows from HDD to SSD.
There are several ways to solve this problem, but you can’t do without an installation disk.
Ways to solve the problem
If the drive on which Windows is installed, be it C or F, is locked, you should do the following:
- We boot into the BIOS and set the priority of booting from disk. Boot from the installation media. At the initial stage, select the installation language and region. We click "Next".
- Next, select "System Restore".
- A window titled "Select Actions" will appear. Select "Diagnostics".
- In the new window, click "Advanced Options".
- In the "Advanced options" select the item "Command line".
- Next, we enter these commands in turn. After entering each, press "Enter".
select disk X, where X is the drive letter on which Windows 10 is installed;
- A list of disks should appear. It should also display a 100 MB partition. If not, enter the following commands.
create partition efi size=100;
format quick fs=fat32 label="System";
assign letter="S";
- Do not close the command line. The exit command is required to exit the diskpart utility.
- Next, enter the following commands on the command line:
BCDBoot c:\Windows /s s: /f UEFI.
After executing this command, you need to remove the installation disk and reboot the system (do not forget to set boot priority from the hard disk in BIOS).
Also, there is another method on how to unlock the F or C drive on which Windows 10 is installed using the command line. To do this, we do all the same steps on how to get to the command line, which are described above. When the console is launched, it is worth entering the following commands:
bootrec /fixmbr;
bootrec /fixboot;
bootrec /rebuildbcd.
These are commands for repairing damaged hard disk partitions. They will also help solve the problem when the hard drive is locked.
In the case when the System Reserved partition is intact and you are using an Intel processor, you should download and install the Intel Rapid Storage Technology driver.
After installing the software and rebooting the PC, the message asking "Unlock the disk ..." will disappear and the system will boot normally.
Sometimes, when you try to open a folder, you may receive an error message. Let's see what can be done if there is no access to the folder.
The reasons why a folder cannot be opened are very different, but I will try to tell you about each of them and instruct you what to do in each case if access to the folder is denied. To begin with, I must say that all The following steps must be performed using an administrator account.
You are not the owner of the folder
After reinstalling or updating Windows, you may no longer be on the list of folder owners, so the system quite reasonably prevents you from reading files that do not belong to you.
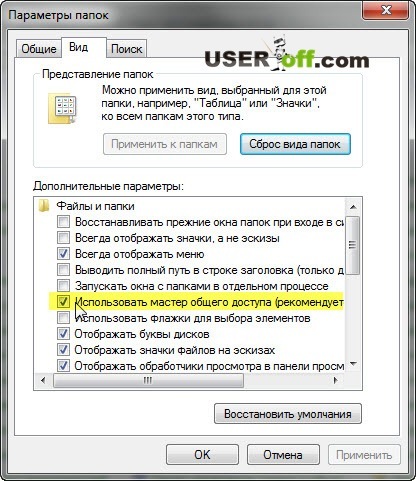
Now I will tell you how to access the folder in this case. First, go to the "Control Panel" menu item and select "Folder Options" or "Folder Options" depending on the system.
In the "View" tab, we find the item "Use the Sharing Wizard (recommended)", if you have Windows 7 or XP, if you have Windows 8 - "Use simple folder sharing (recommended)", uncheck it, click "OK".
Now right-click on the folder and select "Properties" from the drop-down menu. In the "Security" tab, click on "Advanced" and in the new window, click on the "Owner" tab at the top of the window. Click "Edit" on the bottom left.


It is possible that you will not have such a tab. Then you need to go into safe mode and then follow the steps that are described below.
In the window that opens, select the username you want to allow access to and click OK. To gain access not only to the folder, but to all the files and folders inside, we selected the item "Replace the owner of subcontainers and objects" and then click "OK".

As you can see, there is nothing complicated. The bottom line is that the owner of the folder has changed, and in order to fix this, you need to specify yourself as the owner. It's different when you encrypted data and after reinstalling Windows decided to open this folder. That's when your head may just explode, and your problem is solvable and you shouldn't worry! I hope that after following my instructions, you are no longer denied access to the folder that you need.
By the way, if such an error appears when opening a flash drive or disk, be sure to check your computer for viruses.
Here's another option, from the person who posted the video:
Hello friends! The other day, once again, I came across an error when starting some system services. Why do I say that again? The thing is, I've already met her. not for the first time, but somehow I could not get to the description of the ways in which I successfully coped with error 5.
So we meet several possible solutions that can help you if you find problems with starting services, namely “ Errors 5. Access Denied". In general, I will first describe the very essence of the error that I am talking about, so that you can determine the same problem you have or something completely different.
So, by opening the services menu and selecting the item I need, I get into their properties, where in the item about how to start the service, I set the value to “Automatically”, and also click on the “Start” button to start it immediately. But alas, instead of a successful start, a small window is displayed on the screen, with a rather strange message that the service could not be started due to "Error 5. Access denied".
This message surprised me because it said about the lack of rights, although I worked at the computer, logging in using the system administrator account, and as you know, there are all possible rights to change the properties and settings of the operating system.
How to solve the problem with Error 5?
There are quite a few solutions to this kind of problem, namely, fixing the causes of the “error 5. Access denied” when starting services, it all depends on the situation the user is facing. Further, as usual, I will not describe one hundred percent way that will help everyone, since there is none, but I will write about how I got out of this situation with a positive result.
I found some examples of fixing error 5 on the net, but I got to others myself. In general, let's see what in my practice helped to get rid of problems with starting services, but if you try to do the same for yourself, maybe one of the options I suggested will suit you.
"Error 5. Access denied" when starting system services, solutions
1. Opening full access to the "C" drive. I don’t know why, but I came across computers where the security of the system disk was set to read-only and nothing else, and this parameter was set for all accounts. But, as soon as I returned all the security checkboxes, error 5 disappeared forever, but the service started its work without any problems.
To return the rights, you need to get into the properties window of the system drive "C" and go to the tab " Safety". Having missed the list of users and groups, we go down to the "Edit" - "Add" buttons.

In the area that appears, use your hands on the keyboard to type the word " All”, which means that we will set the same access rights for absolutely all users of the system.

If everything is so, then in the previous step you did not make mistakes, click on "OK".

For those who are still Windows XP users, you should pay attention to the fact that by default you may not see the "Security" tab. In order to return it to its place, follow a few simple steps.
- Open any folder;
- Click on "Service" at the top.
- "Folder properties";
- "View";
- In the list of additional options, uncheck the use of simplified sharing.
After that, we perform the above described actions and, of course, we check whether you managed to cope with the error5 using this method or not.
2. Also, there is another way that I got on the Microsoft support pages. Seeing this tip in the comments, I decided to try it and the problem with error 5 when starting the service was solved.
The first step is to open a command prompt as an administrator, but if you are on this account, then you can not worry and just open cmd using "Run".

Now in the window that appears, write this: net localgroup administrators /add networkservice (Important: if you have English. OS then instead of Admin. specify Administrator) and press the Enter key.
Then we do this: net localgroup Administrators /add localservice . (Administrators)

When finished with the commands, close the command prompt window and restart the computer.
If the commands were entered correctly and you were lucky, then error 5 preventing the services from starting should disappear, and the services themselves will start without any access denied messages.
3. We are trying to fix the error with denied access when starting services using the registry of the operating system.
But, before we rush to chop up our registry, we first need to find out the name of the service that does not want to start. To do this, in the list of services, open the properties of the service we need and look at the line " Service name". Having remembered it, we proceed directly to working with the registry.

Registry Editor - launch it using the "Run" window. If you do not understand what it is, then you.
You should see a large list of services in alphabetical order. In order to understand what kind of service we need, I said to look at its name in the properties. So we are looking for a section with the appropriate name, right-click to call up the section menu and select the line " Permissions».

The same security setting as I described in the first paragraph should be displayed. In general, we look to ensure that full access is set in the "Administrators" and "Users" groups.

If they are not there at all, then we fix this matter, in the same way as I showed it at the beginning of the article.
4. Let's consider one more point, which is also related to access to the C drive, only this time not to all users, namely LOCAL SERVICE.
So, again we go into the security properties of the system disk. Next, after the list of users and groups, click on the "Add" button.

In the window that appears, click on "Search". As a result, a list should appear from which we need to select "" and click on the "OK" buttons.

This group should be added to the user's list, now for going down a little lower to the "Permissions for LOCAL" window, set all possible checkboxes and apply the changes.

In theory, the service should start after that, but error 5, disappear without a trace.
5. Alternatively, you can also disable or remove your antivirus and try to start the service without it. The fact is that some antivirus programs, in addition to software, install additional services of their own that could take away your rights to enable or disable some local services.
6. Well, the one hundred percent option, of course, is, I know that it won’t suit everyone, but I can tell you with confidence that it will definitely help get rid of error 5 with denial of access to start the service, well, and additionally save the computer from various other glitches and problems 🙂
On this I will probably finish my article, but if at least one of the above options helps you, then do not forget to join us
It may happen that after reinstalling Windows or for some other reason, the system will deny you access to some folders or files on local drives, especially if a previous version of Windows remains on one of these drives.
But what if we say you have important files on your old desktop, or in your downloads folder, or in your documents folder, or in some other special place? This article addresses this issue and presents two ways to regain access to such folders or files. For example, the suggested solutions were performed on Windows 10, but the following is true for Windows 8 and Windows 7.
First way
Right-click on the restricted folder and select "Properties" from the context menu. In the folder properties dialog that opens, switch to the "Security" tab, then in the "Groups and Users" list, find the item with the name of the account under which you are logged in and click on it with the mouse. In the lower field you can see the permissions for the folder.

You may also not see your account listed as shown in the picture above. In any case, click on the "Edit" button to change your account's access rights to the folder. If your account is listed in the upper field, skip this paragraph and read on, otherwise click on the "Add ..." button.

In the dialog that appears, type in the name of your account in the lowest field, click on the "Check names" button.


Highlight the item with the name of your account in the upper field, and in the lower box check the box next to "Full access", then click the "Apply" button.

If you see the following message while applying the settings:
Error applying security settings to... Failed to enumerate objects in container. Access denied.

or message:

Then close all dialog boxes and try the second method.
Second way
Right-click on the restricted folder and select "Properties" from the context menu. In the folder properties dialog that opens, switch to the "Security" tab, then click on the "Advanced" button.

In a new window, in the line owner, click on the "Change" link, if you need to enter your account password, enter the password and confirm the action.

A dialog box for searching and adding an account will open, the same as in the first method described above. Type in the name of your account in the lowest field and click on the "Check Names" button.
The system will find and format your account name. Click on the "OK" button to add the found account.
The dialog box will close and in the previous window, in the "Owner" line, you should see the name of your account. Be sure to check the "Replace owner of subcontainers and objects" box below it to access all subfolders and files in the folder you are trying to access, then click the "Apply" button.

Agree with the warning that you want to change the permissions for this folder so that you have full control rights by clicking on the "Yes" button.

In the next informational message, also click the "OK" button.

As a result, you should see only one item in the change owner window with the name of your account.

Click OK and close the main folder properties dialog box by clicking OK.
All! The folder should open as usual.